 Skip to content


Detailed instructions for installing and activating eSIM on iOS devices such as iPhone/iPad. The actual steps and interface vary by iOS version and iPhone model.
Preparation
-
Confirm Device Compatibility for eSIM
-
Your iPhone is Carrier Unlocked
-
Ensure Stable Network Connection
An iPhone XS, iPhone XS Max, iPhone XR, or later supports eSIM. Models from iPhone 13 may supports dual eSIM (depends on your version). Note that models from mainland China do not support eSIM, but some models from Hong Kong and Macau do. Quickly check your device's compatibility using the Apple eSIM compatible device list or check or check the Apple support page.
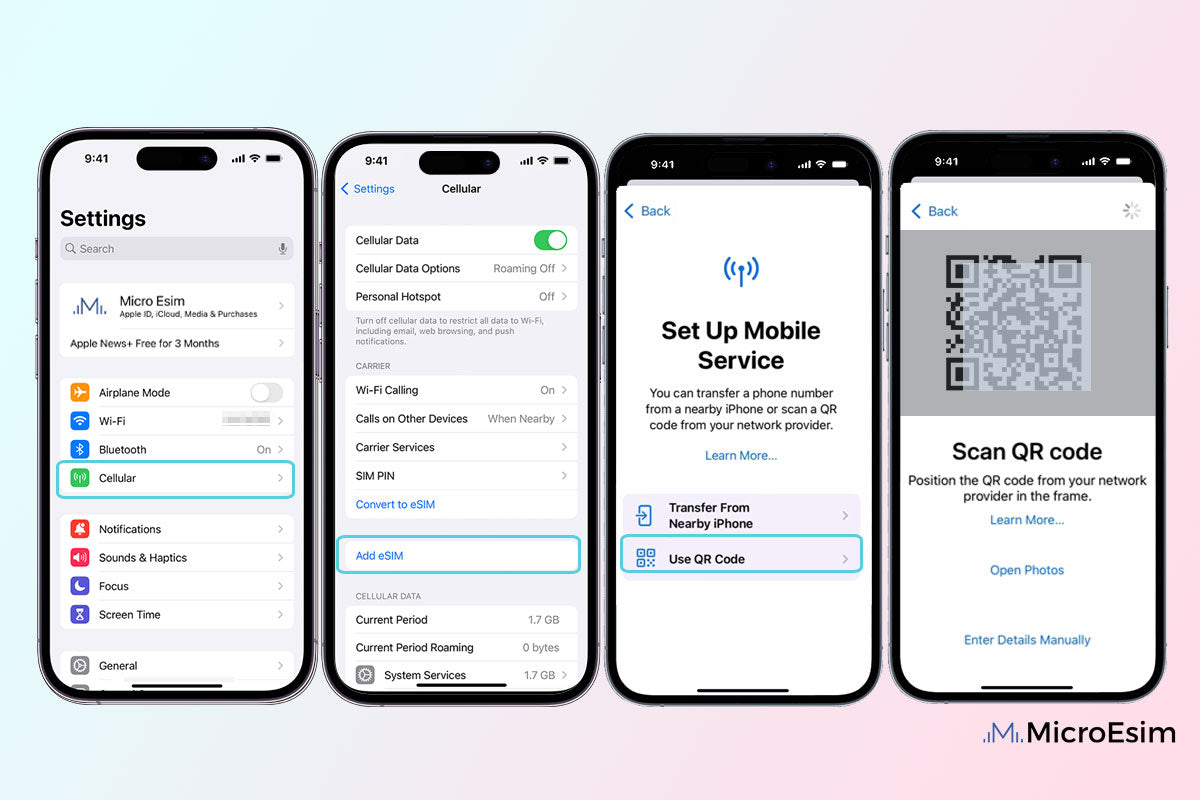
Install Using QR Code
Method 1: Scan the QR code with your iPhone camera

Method 2: Scan and add in the settings page
1. Open Phone Settings
Tap Settings > Cellular or Mobile Data > Add eSIM or Add Cellular Plan or Add Mobile Data Plan > Use QR Code.
2. Scan QR code
Use your phone’s camera to scan the eSIM QR code received via email.
Method 3: Add eSIM from the Photos app
1. Open Phone Setting
Tap Settings > Cellular or Mobile Data > Add eSIM or Add Cellular Plan or Add Mobile Data Plan > Use QR Code > Open Photos.
2. Pick the eSIM QR Code
Select the photo of the eSIM QR code from your gallery. Your iPhone will scan the QR code and install the eSIM.

Manual Installation
1. Check email from MicroEsim
Find the email from service@microesim.com that contains your eSIM information.
2. Open Phone Setting
Tap Settings > Cellular or Mobile Data > Add eSIM or Add Cellular Plan or Add Mobile Data Plan > Use QR Code > Enter Details Manually.
3. Enter Activation Code
Enter the corresponding "SM-DP_Address" and "Activation Code". Please be careful not to include unnecessary characters like spaces.

Other eSIM Install Methods
1. Press and hold eSIM QR Code
This method is applicable to iOS17.4 or above. MicroEsim will send the eSIM installation and activation information in your order via email. Long press the eSIM QR code in the email, and in the pop-up prompt, tap the "Add eSIM" option.

2. Add eSIM from Control Center
iOS 18 introduces new ways to add eSIM. Apple has redesigned the Control Center in iOS 18, making it more intuitive and user-friendly. Through the Control Center, you can quickly access the camera to scan the QR code, and you can also quickly enter the Cellular Settings to add your eSIM.
2.1 Qucik access to scan QR code
You can add the "Code Scanner" to the control items for quick access and use the camera's QR code scanning function through the Control Center. In iOS 18, you can add it directly from the Control Center. For versions prior to iOS 18, you need to go to Settings to add the Scan barcode function to the control items.

2.2 iOS 18 Quick Access to Cellular Settings
Go to the Control Center, press and hold the Cellular Data, and select "Cellular Settings > Add eSIM" from the pop-up menu. If you have multiple SIM cards installed, this method can also be used to switch the default mobile data card between different SIM cards.When using travel eSIM from MicroEsim, you need to select it as the cellular data line, which is explained in detail below.

Activate eSIM
1. Tap Continue to Activate
After using the QR code or manually installing the eSIM profile information, you will be taken to the Activate eSIM page, just tap "Continue" to until the activation done.

How to solve iPhone stuck on "Activating..." & "Unable to Activate eSIM" error
This is most common when you are not yet arrived at your destination and there is no supported network for MicroEsim's travel eSIM to be activated. You may wait approximately 10 minutes for the 'Unable to Activate eSIM' message to appear, or restart your phone to expedite the process. Afterward, turn off the eSIM. Once you arrive at your destination, turning the eSIM back on will restart the activation process.
This is due to delays from the carrier or unsupported networks, an installed eSIM may display "Activating...".
This is part of the iPhone's eSIM activation process. Once installed, the phone will immediately attempt to activate the eSIM and connect to a network. If it cannot connect, it will display "Activating" for about 10 minutes before showing "Unable to Activate eSIM".
If you receive a notification saying that activation or enabling failed, you can try disabling other SIM cards on your phone, leaving only the newly installed eSIM active. This usually resolves the issue more quickly.
If you encounter an activation error after installing the eSIM upon arrival at your destination, try manually selecting the appropriate carrier in Network Selection.
If you haven't reached your destination yet, it's best to turn off the eSIM and enable it once you arrive.
Of course, you can always contact MicroEsim customer support if you need further assistance.

Hot to solve "eSIM cannot be add - This Code is no longer valid" error
Sometimes, you may get the troubleshoot "eSIM Cannot Be Added - This code is no longer valid" Error as below. Mostly, the eSIM is already added to your phone and you may check the sim list. For detailed steps on how to resolve this issue, please refer to our guide on resolving the 'This code is no longer valid' Error.

2. Configure the eSIM Label
After activating your eSIM, you will typically see the SIMs List settings page. The newly added eSIM will appear at the bottom of the list and is often labeled "Travel" or other preset labels by default. If you prefer a different label, you can customize it at any time. Simply select the corresponding eSIM and modify its name according to your preference. Here we customize the label as "MicroEsim" in the blank "CUSTOM LABEL".

3. Configure Defalt Line and Cellular Data
Sometimes the default line settings will appear.
- Default Line >> Select "Primary".
- iMessage & FaceTime >> Select "Primary", which allows you to keep your original number for iMessage and FaceTime.
- Mobile Data or Cellular Data >> If you haven't arrived in your destination yet, select your original SIM card. If you have already arrived in your travel destination, select the newly added eSIM. Be careful not to turn on the "Allow Mobile Data Switching".

Note:
Be suer the MicroEsim's travel eSIM is set to be the defalt mobile data/ cellular data line when you are using it.

Connect to Network (Enable Roaming)
Typically, the newly installed eSIM is turned on by default. If you do not plan to use it immediately, you can turn it off. Once you arrive at your destination and are ready to use the eSIM, ensure the following:
- Turn on MicroEsim's Cellular Data eSIM
- Enable roaming for this eSIM
- Set this travel eSIM as the default line for Cellular Data
*Note: Some eSIM products come with a local IP and do not require roaming. They can be activated immediately after installation but network access available only upon arrival at your destination. This information will be included on the eSIM data plan product page

Select Available Network / Carrier
Mobile devices usually detect and connect to the appropriate network automatically based on your eSIM settings and location. This process can take a minute or two. However, sometimes the automatic network selection may fail or connect to the wrong network. If you’re having trouble with your mobile data connection, first identify which networks your eSIM is meant to use in the country you are in. This information is typically found in the description of the MicroEsim product page.
After activation, monitoring your data usage becomes essential—especially when traveling.One of the biggest pain points for iOS users is that iOS does not clearly show real-time remaining data for eSIM plans.With the MicroEsim App, you can check your data usage in real time, helping you avoid sudden disconnections or running out of data unexpectedly.
Manually selecting a network will usually resolve connection issues caused by auto-selection glitches, and will also override auto-selection, so if you travel to a new country or region during your travels, you may need to manually switch again.
Follow these steps to manually select the correct network:
1) Go to Settings > Cellular.
2) Select the eSIM or Cellular Plan under the SIMs section.
3) Tap Network Selection.
4) Turn off Automatic.
5) Select the correct network from the list.

If you encounter any problems during installation or activation, please feel free to contact us.


