 Skip to content


The iPhone has supported eSIM since 2018, bringing improved flexibility and convenience in handling mobile networks with much ease. But what is an eSIM card for iPhone? How to use it on your iPhone? In this comprehensive guide, we will take you through everything concerning the eSIM card iPhone uses. Read on to get more detailed information.
Can You Use eSIM on iPhone? How It Benefits?
An eSIM is a digital SIM that enables you to activate a cellular plan without a physical SIM card. However, it relies on the iPhone eSIM card compatibility. So, let's see which iPhone models support eSim first.
Supported eSIM Models
Note that not all models allow iPhone eSIM cards. Before you plan to get one, make sure the device is compatible. Here is the list of iPhone models supporting eSIM:
| Year | Model |
|---|---|
| 2018 | iPhone XR, iPhone XS, iPhone XS Max |
| 2019 | iPhone 11, iPhone 11 Pro, iPhone 11 Pro Max |
| 2020 | iPhone SE (2nd generation), iPhone 12, iPhone 12 mini, iPhone 12 Pro, iPhone 12 Pro Max |
| 2021 | iPhone 13, iPhone 13 mini, iPhone 13 Pro, iPhone 13 Pro Max |
| 2022 | iPhone 14, iPhone 14 Plus, iPhone 14 Pro, iPhone 14 Pro Max |
| 2023 | iPhone 15, iPhone 15 Plus, iPhone 15 Pro, iPhone 15 Pro Max |
Note:
This feature is not available on iPhones in mainland China. Some iPhone models support eSIM in Hong Kong and Macao. For a complete list, check the official Apple devices for the eSIM page.
Why Choose eSIM for iPhone
Upgrading to eSIM iPhone comes with many benefits that greatly improve mobile experience in real-life situations. For example, this might be when traveling or being forced to juggle between work and personal life. Here are four key reasons why you should opt for eSIM on your iPhone:
- Flexibility: Switch quickly from one cellular plan to another, along with changing carriers that do not require a physical card.
- Dual-active SIMs: You can use both eSIM and physical SIM cards on a single device. It is very useful during traveling, allowing you to keep the phone number of your home country active for necessary calls and texts while you get a local eSIM for cheap data and local calls.
- Increased Security: eSIMs are safer than physical SIM cards. They can't be swapped or accessed without authorization if your iPhone is lost or stolen. eSIMs are encrypted and regulated by network operators, making it difficult for anyone to steal or change your information.
- Easy activation: Setting up eSIM on an iPhone is extremely easy. Most of the time, it can be done by scanning a QR code, especially when compared to activating a regular SIM card.
Full Steps to Get eSIM Ready to Use on iPhone
Using eSIM on your iPhone brings several benefits, but setting it up and activating it correctly is crucial. Here, we'll guide you through the steps to install an eSIM card on your iPhone, and get ready to use it.
Set up eSIM on iPhone
If you purchase a new iPhone directly from the carrier, you can just set up eSIM when setting up your new iPhone to add it as a cellular plan, because they have assigned an eSIM for your new iPhone. Here are the steps.
Note:
Some eSIM carriers have an alternative method that involves their app. Just download the app and follow the on-screen instructions.
Step 1. Follow the onscreen instructions to set up your new iPhone. Choose a WIFI to connect.
Step 2. When the cellular setup window appears, tap Continue to finalize the setup.
Step 3. Then your eSIM plan will be added to your phone.

If you already have the eSIM but would like to transfer it from the old iPhone to the new one, here are the specific steps in setting up the eSIM:
Step 1. Make sure that your old iPhone and new iPhone are both near and on the same Wi-Fi network. Both devices need iOS 16 or later.
Step 2. When setting up your new iPhone, tap Transfer from another iPhone on the Set up eSIM screen.
Step 3. On the old iPhone, hit Transfer SIM card, and enter the code shown on your old iPhone into your new iPhone.
Step 4. Tap the side button on the old iPhone to complete the process of transferring. Now, on the new iPhone, wait for this process to be complete, then hit Continue.

If you have newly purchased an eSIM, the carrier will provide you with a unique QR code. You can use the QR code to install your eSIM on your iPhone. Here are the steps.
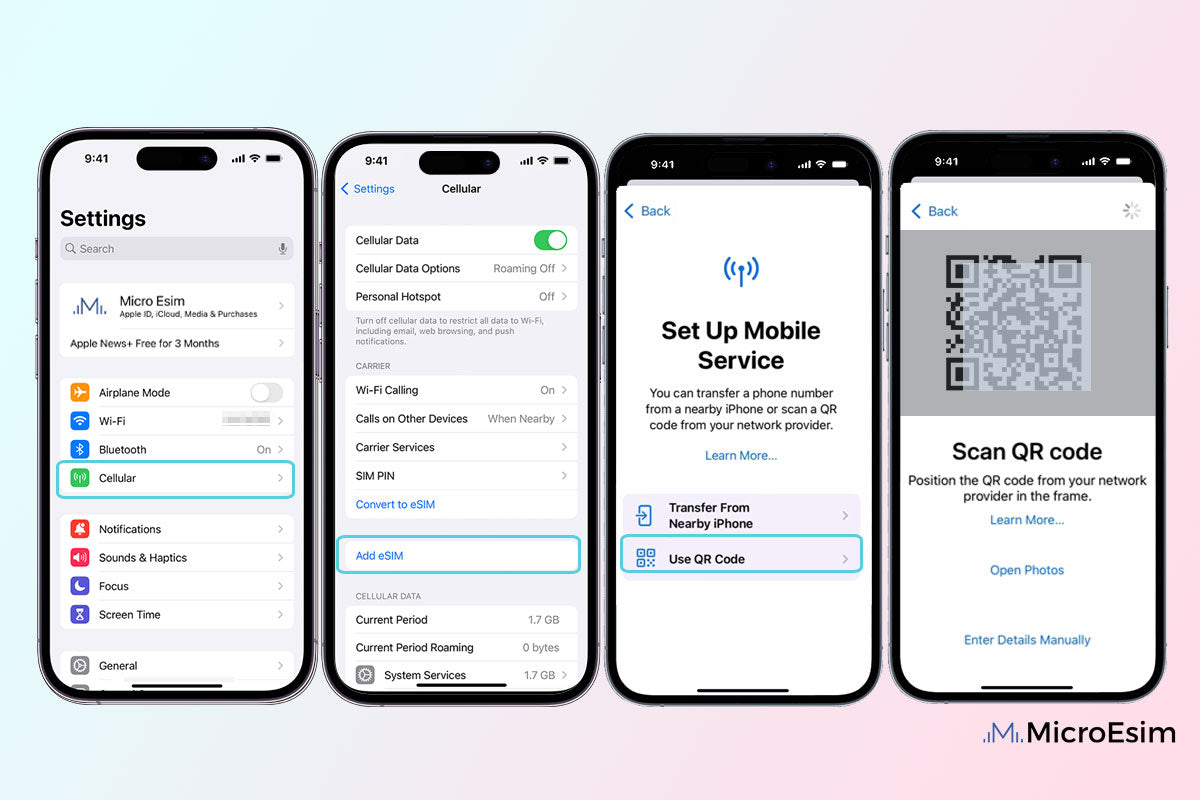
Step 1. Go to the Settings.
Step 2. Go to the Cellular, then Add eSIM, then Use the QR Code.
Step 3. Scan the QR Code using your iPhone (you can also choose to manually enter the activation code by tapping Enter Details Manually at the bottom).
Activate eSIM on iPhone
After you install eSIM on your iPhone via QR code, you can further activate it if it is not currently turned on.
Tips:
If you encounter any issues during activation, refer to the following guide for troubleshooting:
>> How to Fix eSIM QR Code Activation Errors on iPhone [Full Guide]
Step 1. Go to settings, then Cellular or Mobile data.
Step 2. Choose your eSIM. You can name your eSIM to your preference by editing the Cellular Plan Label.
Step 3. Check Turn on This Line to switch your eSIM. Turn the Roaming feature.

Step 4. Select your desired eSIM for primary use under Default Line, iMessage & FaceTime options, and the Cellular Data option.

Delete eSIM on iPhone
If you want to know how to delete eSIM from iPhone after your trip, here are the simple steps:
Step 1. Navigate to Settings on your iPhone, and enter it.
Step 2. Tap on Mobile Data, and choose the plan you would like to delete.
Step 3. Tap "Delete eSIM" to remove it from your iPhone.

Related:
For more details about the deletion, you can check the full guide:
Tips for Using eSIM on iPhone While Traveling
For travelers who are planning to use an eSIM, here are some tips you can take to maximize your benefits.
Managing Data Usage
Staying within your subscribed data plan is very important in avoiding overspending. Make sure you keep checking your data usage through Settings > Cellular to check on your usage to ensure that you are within your limits. Try to connect via WiFi that most public places offer free WiFi, which will help save on data usage.
Switching Between eSIMs
Travelers can enjoy great flexibility by switching between eSIMs. This can be helpful if you have different plans for different purposes, like separating data plans for various destinations. Picking between country-specific and regional plans is important as it will help you get the most reliable networks and cheap rates according to the area covered in your travel schedule.
Avoiding Roaming Charges
Using local eSIMs will help save on expensive roaming and eventually make your journeys much more cost-effective. Prices with the local plans are usually more reasonable for the value, not to mention all the benefits associated with their better coverage compared to international roaming. This way, you can stay connected without worrying about excessive charges.
Bonus: Best eSIM Providers for iPhone
Having covered various aspects of using eSIMs on your iPhone, you might be wondering which one to choose. Let's introduce you to one of the best eSIMs, MicroEsim.
MicroEsim is a highly recommended eSIM provider. One of its key advantages is that it doesn't require eKYC (identity verification), and the activation process is incredibly easy. Just simply scan the QR code sent by customer service. It also supports multiple devices, not only iPhones but other Androids. Additionally, It offers various data plans, allowing you to choose the one that best fits your needs. Now, grasp MicroEsim as the best eSIM card for international travel to start your journey!

Related Articles:
Conclusion
It is easy and convenient to use eSIM cards, especially when it comes to international travel. Are you ready to go on your next trip with your eSIM? Consider trying MicroEsim. It ensures a smooth experience and can be utilized with many devices. With it, handling all your connectivity requirements while on the move has never been easier.


